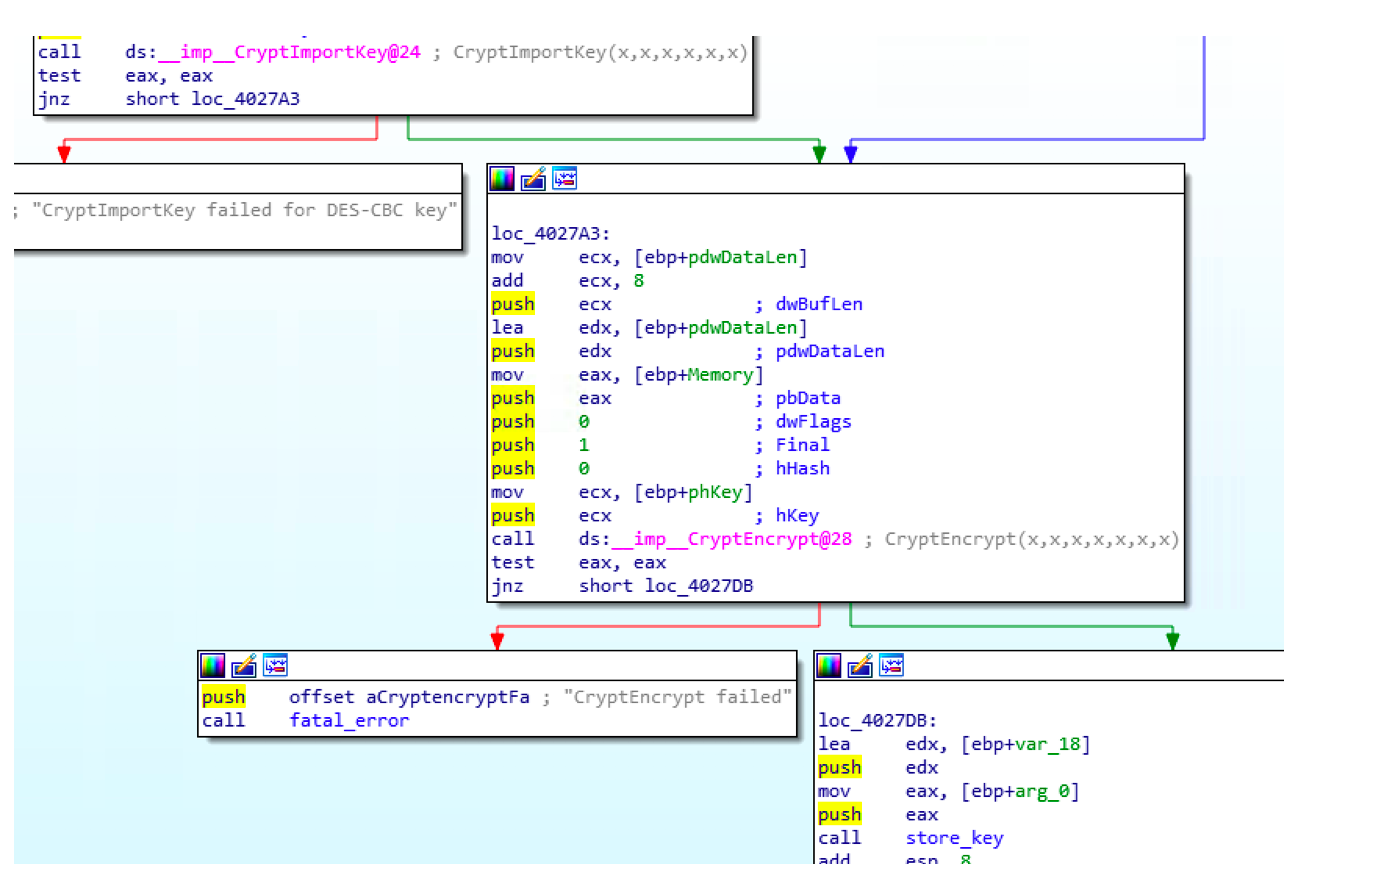
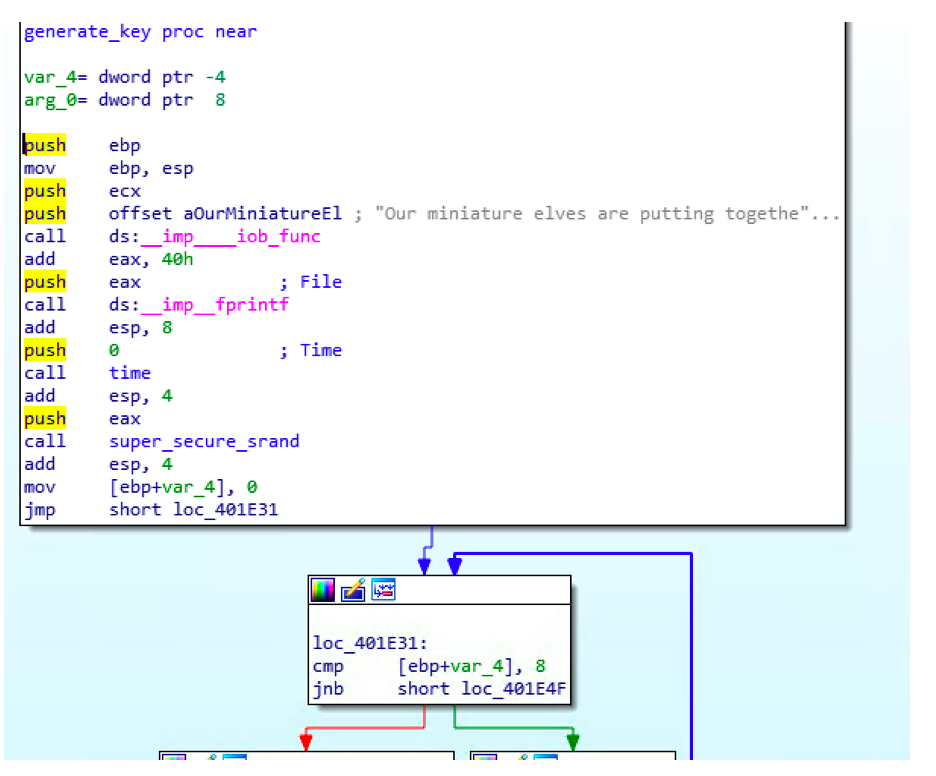
Sunday, May 31, 2020

Step by Step Monte Carlo Simulation

No one, especially from the scientific/engineering community, doubts about how powerful is Monte Carlo random sampling method, particularly when it is about simulating an unknown phenomena or making experimental calculation giving shortage in time/resources.


Despite its high usefulness in a wide range of scientific and technical fields, this method keeps somehow mysterious and time consuming from implementation point of view. In most of the cases you need to be a Microsoft Excel expert or an experimented programmer to implement it the right way.

In this article, we will start by making a practical presentation of Monte Carlo method by going through two concrete Excel implemtnation examples: calculating two dices throwing outcomes and estimating cost/duration for a house construction project.

In the second part, we will present Lazycarlo a user interface based Monte Carlo engine, by using it to simulate the house construction project.

To read the rest of the article on Medium, please click here! 

Thursday, January 16, 2020

Reverse engineering an encryption binary using IDA


A step by step SANS KingleCon2 2019 holiday hack challenge case study 

This article was also published as part of my write-up at the following URL: 
https://medium.com/@walid.daboubi/sans-kringlecon-holiday-hack-challenge-2019-write-up-b47dbb7ce0c1

Context 

  • The encrypted document saved to encrypted_test_document.txt
  • A seed: 1578901591
  • An encryption key: 6eec852fbca5a71c
  • A secret id: bca2ff81-fdd5–4ac3–8aa4-a2d4e2b45154


Yes as you guessed, the next step is to have a look at the shark 


As we are trying to understand how does the encryption work, let’s try We can then check the do_encrypt function.
We can see that it starts by reading the file to encrypt
It then imports the key, encrypts the input file and finally stores the key
As we are interested to get how the key is generated, we will have a look at generate_key function.
As we can see, generate_key function is calling time function and then giving the the result (stored in EAX) as an input for super_secure_srandfunction.


What we can conclude it that the key generation may be based on current. The make sure about this conclusion we can make a small experience:
  • Add a breakpoint at push EAX before calling super_secure_srand

  • Check the value returned by time (stored at EAX)
  • Modify the value of EAX
  • Check if the value returned by generate_key changes if we change the time. This could be done by adding a breakpoint at push EAXjust before calling print_hex (because we are pushing a value that contains a the key to be displayed to the stack, as an argument for the function call. And since we are pushing EAX, it should contain the key)

Truth moment, let run the executable. This could be done by adding the necessary arguments by using Debugger->Process options.
We now can run the executable.
As we can see below It breaks at the first breakpoint, we double click on the RAX in General registers list to get the value currently stored in EAX. It displays 0x000000005E1C3235which is 1578906165,hum it looks like a timestamp. Yes, indeed it’s the current time Monday, January 13, 2020 9:02:45 AM.
What we can do now is the modify the value stored in EAX (the timestamp) with the seed (yes, it’s a timestamp, we can check it by converting it to human readable time) we get when testing the executable in the beginning (1578901591) and check if we get the same key(6eec852fbca5a71c).
By keeping in the same breakpoint, we change the value stored in EAX:
We continue the execution until the next breakpoint we defined. And check the value of the key (stored in EAX before getting pushed to the stack).
As we can see in the previous instruction just before push, we moved a memory address the EAX. Let’s check the value of EAX (the memory address).

Let’s now check the content of that address by clicking on jump in a new window.
And, bingo It contains the key 6eec852fbca5a71c
We now are totally sure that the key is generated based on the timestamp.
As the the Elfscrow.exe uses the same key generated at encryption to decrypt the encrypted file, and as we now that the encryption was done on Dec 12thbetween 7pm and 9pm. We can consider writing a program that given a timestamp produces a key using the same logic in Elfscrow.exe and that trying all the timestamps between Dec 12th7pm and Dec 12th9pm. Before applying this idea we need to understand two things:
  • What is the logic Elfscrow.exe uses to generate key based on a timestamp
  • How does the decryption work in term of used functions/librarie.


Step3

Understanding how is the function generate_key transforming the seed (timestmap) to a key
When having a look at the code in generate_key function we can see two interesting function, super_secure_srand and super_secure_rand.
super_secure_srand is taking the content of EAX (which is the timestamp) as argument. We concluded this in the previous experiment above.
Let’s have a look inside super_secure_srand
We we can to get a more concrete idea of what it is doing, we set a breakpoint at mov state, ecx and check the value of ECX.
It contains the same seed value 1578901591. We now know that this function set the state variable to variable to the seed value.
Let’s now have a look at super_secure_random function.
The first thing we can notice is that it is using the state variable which contains the seed value. Let’s try to figure out what is this function doing.
As we can see starting from the @ 012B1DC3 it:
  • It sets EAX to state (the seed value)
  • It multiplies the seed by 343FDh and save the result in EAX
  • It adds 269EC3h to EAX
  • Saves the value of EAX in state
  • Save the value of state in EAX
  • Shifts 10h bits of EAX to the right
  • Make and ADD operation of EAX and 7FFFh and save the result to EAX

Interesting, we now know how does super_secure_random work. When we get outside the function we can see that it is put inside a loop that repeats 8 (which is the key length) times.
  • Update EAX to it’s new value (using super_secure_random)
  • Copy the low part (AL) of the value store in EAX to ECX
  • Make and ADD operation of ECX and 0FFh and save the result to ECX
  • Append CL to a memory address stored in EDX
To get more sense about what’s happening let’s set a break point at the @ 0x012B1E4B and keep watching the content of CL (Low part of ECX)for the 8 iteration.
Well, we know understand that chunks of the key are stored on every iteration in CL to finally get final key 6eec852fbca5a71c which will be stored at [EDX].
Now that we know the algorithm used to generate the key we can easily write a C program to imitate it, something like (it worked for me):
#include <stdio.h>
#include <windows.h>
#include <strsafe.h>

long multiply(long long x, long long y) {

    return  (long)x * y;
}
int main() {
    long timestamp = 1578901591;
    int KEY_LENGTH = 8;
    long seed = timestamp;
    long state = 0;
    char* hex_chunk = "";
    char key[16] = "";
    int len;
    for (int i = 0; i < KEY_LENGTH; i++) {
        hex_chunk = "";
        state = multiply(seed, 0x343FD);
        state = state + 0x269EC3;
        seed = state;
        state = state >> 0x10;
        state = state & 0x7FFF;
        sprintf(hex_chunk, "%x", state);
        len = strlen(hex_chunk);
        const char* last_two = &hex_chunk[len - 2];
        strcat(key, last_two);
    }
    printf("The seed value is %i\n", timestamp);
    printf("The key value is %s\n", key);
}

This program could be fount at: https://github.com/slrbl/SANS-KringleCon-Holiday-Hack-Challenge-2019/blob/master/10/key_gen.c 

After compiling the code, we execute it and we get the following:
We are now able to generate a timestamp based key using the same logic in Elfscrow.exe ;)

Step4

Understand how is the decryption done (from operational/API point of view)
Let’s start by having a look at the content of do_decrypt function:
This function is calling three main functions:
We observe that each of the above functions takes the result of the precedent one as a parameter (with other parameters).
After a small research we conclude that those function belongs to Windows Wincrypt.h. Documentation about the functions could be done found at https://docs.microsoft.com/en-us/windows/win32/api/wincrypt/nf-wincrypt-cryptimportkey.

Step5

Putting all together: Coding time 
Now that we know how to generate a key with the same logic used in Elfscrow, that the key was generated on Dec 12thbetween 7pm and 9pm and how to use Wincryp API, we can finally write program to decrypt the document and get the original PDF. The C program could be found at: https://github.com/slrbl/SANS-KringleCon-Holiday-Hack-Challenge-2019/blob/master/10/decryp.c

Step6

Bingo time  
The git repository contains a precompiled executable of the decryption program we wrote. But in case you do modification, you can compiling using cl (Visual Studio developer tools) command as the following:

After compiling the program, we launch it and keep waiting until a file with the same size as ElfUResearchLabsSuperSledOMaticQuickStartGuideV1.2.pdf.enc appears in the output files. Please not that the result will be saved in ./result folder.
The following is an example of launching the decryption program and the output you get when it succeeds:

...


After a while, we get the decrypted PDF decrypted_dest_1575663650.pdf. According to the timestamp, it was encrypted at Friday, December 6, 2019 8:20:50 PM.
The decrypted document could be found at: https://github.com/slrbl/SANS-KringleCon-Holiday-Hack-Challenge-2019/blob/master/10/decrypted_dest_1575663650.pdf

The document first page is:


Thank you and enjoy!

Thursday, July 5, 2018

Malicious URLs detection with a deep learning autoencoder

One of the main challenges that may face a machine learning developer while working on security/threats hunting topics is the rareness of malware and attacks labeled data. In cybersecurity labeled datasets could be system logs, network traffic or any other data enriched with threat/not threat classification. Generating this kind of datasets is time and effort consuming since security professionals need to manually label their raw data in order to get machine learning usable training data.

In this context, finding a way to train detection models using only raw data or more precisely negative data (normal cases) could be a really great solution of the above described problem.

This article describes building a URLs classification model using only normal (non malicious) URLs dataset. The resulting classifier will be able to distinguish between a malicious and a non malicious URL.


A hand drawn Autoencoder facing the Atlantic Ocean - Photo taken in Obidos, Portugal

How is it possible?

The first intuition that could come to minds to implement this kind of detection model is using a clustering algorithms like k-means. Using this algorithm could actually solve the problems but only partially since we don't have any guarantees of getting only two clusters representing malicious and normal data.

Another interesting solution to train classifier using only one class (normal cases) is to use an autoencoder neural network. Auotencoders are a variety of deep neural networks that aims to produce in their outputs the same data they receive as input. The idea is to feed an autoencoder with only non malicious URLs and since we are supposed to get the same data in output, we will calculate the reconstruction error (error between the input and the prediction) to decide if it is about a malicious URL based on a predefined threshold.

About autoencoders

As above cited an autoencoder produces (or tries to) on its output the same data it receives in its input. The first question we may want to ask is: why will we be interested in producing the same data we provide to a prediction model? well, an excellent answer of this very legitimate question could be our case, detecting anomalies by calculation the reconstruction error rate. But autoencoders have multiple other interesting applications that could be found here.


An Autoencoder Neural Network

Training/testing data

The dataset we are going to use is retrieved from Kaggle. It contains a list of 420465 URLs with good/bad labels to mention if the concerned URL is malicious or not. We will use only the 'good' URLs to train the autoencoder. And since it will be exciting to check if our model is working we will use both good and bad URLs for testing. 80% of data will be used for training the model after keeping only the normal cases and 20% will be used for testing.

Implementation

The implementation is coded in Python using Keras for building and training the model and Panda for data manipulation.

Data preprocessing

The following are sample rows from the raw dataset:


 url,label
 diaryofagameaddict.com,bad
 espdesign.com.au,good
 iamagameaddict.com,bad
 kalantzis.net,bad
 slightlyoffcenter.net,good
 toddscarwash.com,bad
 tubemoviez.com,bad
 ipl.hk,bad
 crackspider.us/toolbar/install.php?pack=exe,bad


This data is not usable in it's current state, we need to enrich it by generating the following new features:
  • Length: length of the URL
  • Depth: the occurrence of '/' character in the URL
  • Numerical count: count of numeric characters
  • Words count: count of English words present in the URL
  • Special chars count: count of specials characters 
All the above features could be easily extracted from a raw URL except the words count . In order to extract the word count we are using an English dictionary and increasing a counter every time a word in the dictionary is contained in the URL. This is a quite heavy calculation, it took me about 26 hours to get it for the current dataset. If you have any other solution, please share it as a comment. The following lines are used to generate the new features starting from the raw dataset:


 import sys
 import os
 import csv

 LETTERS = ['a','b','c','d','e','f','g','h','i','j','k','l','m','n','o','p','q','r','s','t','u','w','x','y','z']
 SPEC_CHARS = ['+','\"','*','#','%','&','(',')','=','?','^','-','.','!','~','_','>','<']
 NUMBERS = ['0','1','2','3','4','5','6','7','8','9']

 enriched_csv = open('url_enriched_data.csv','w')

 enriched_csv.write('len,spec_chars,domain,depth,numericals_count,word_count,label\n')

 def check_url_contains_words(url):
    found_words = []
    for letter in LETTERS:
        dictionary = open('{}/dictionary/wb1913_{}.txt'.format(os.path.dirname(os.path.realpath(__file__)),letter),'r')
        for line in dictionary.readlines():
            word = line.split('</B>')[0].replace('<P><B>','').lower()
            if str(word) in url.lower() and len(word)>1 and word not in found_words:
                found_words.append(word)
    return len(found_words)

 count = 0
 for row in  csv.reader(open('url_data.csv','r'), delimiter = ','):
    #print '-----'
    print str(count)
    count+=1
    if 'bad' in row[1].lower():
        label='1'
    else:
        label='0'
    spec_chars=0
    depth = 0
    numericals_count = 0
    word_count=0
    url = str(l[0])
    #print url
    word_count=check_url_contains_words(url)
    for c in str(l):
        if c in SPEC_CHARS:
            spec_chars+=1
        if c in ['/']:
            depth += 1
        if c in NUMBERS:
            numericals_count += 1

 enriched_csv.write(str(len(l[0]))+','+str(spec_chars)+',0,'+str(depth)+','+str(numericals_count)+','+str(word_count)+','+label+'\n')


Here are some sample rows wet get after using the above code (0 is used as a label for good URLs and 1 from the bad ones):


 len,spec_chars,domain,depth,numericals_count,word_count,label
 41, 2, 0, 3, 0, 10, 0
 31, 3, 0, 2, 0, 8 , 0
 22, 2, 0, 2, 0, 11, 0
 21, 1, 0, 1, 2, 5 , 1
 23, 1, 0, 1, 0, 8, 1
 69, 5, 0, 2, 0, 52, 0
 30, 2, 0, 1, 2, 13, 1
 56, 3, 0, 1, 2, 22, 1
 68, 7, 0, 3, 1, 31, 1
 53, 2, 0, 4, 5, 24, 0
 31, 6, 0, 1, 0, 11, 0
 42, 3, 0, 5, 6, 15, 0  


At this point our data is ready to be fed to the autoencoder. Of course, other features like domain and whois results could be generated, may be you will have the courage to make this enhancement!

Data importation

The following lines are used to import data form the CSV we prepared in the previous step and splitting it into training and testing data.


 import panda as pd

 # Importing data from the CSV we created using Panda
 df = pd.read_csv("enriched_url_features.csv")

 frauds = df[df.label == 1]
 normal = df[df.label == 0]

 # Remove domain row (this row is empty)
 data = df.drop(['domain'], axis=1)

 # use 0.8 of the data for training and the rest for testing
 X_train, X_test = train_test_split(data, test_size=0.2)

 # Take only the normal (non-malicious) URLs as training data
 X_train = X_train[X_train.label == 0]
 X_train = X_train.drop(['label'], axis=1)
 y_test = X_test['label']
 X_test = X_test.drop(['label'], axis=1)
 X_train = X_train.values
 X_test = X_test.values


Architecture of the Autoencoder

The used autoencoder contains in total 8 layers. The first three layers are used for encoding, the middle one as 'code' layer and the last three ones are used for decoding.


 input_layer = Input(shape=(input_dim, ))
 encoder = Dense(encoding_dim, activation="tanh",
 activity_regularizer=regularizers.l1(10e-5))(input_layer)
 encoder = Dense(int(encoding_dim), activation="relu")(encoder)
 encoder = Dense(int(encoding_dim-2), activation="relu")(encoder)
 code = Dense(int(encoding_dim-4), activation='tanh')(encoder)
 decoder = Dense(int(encoding_dim-2), activation='tanh')(code)
 decoder = Dense(int(encoding_dim), activation='tanh')(encoder)
 decoder = Dense(input_dim, activation='relu')(decoder)
 autoencoder = Model(inputs=input_layer, outputs=decoder)


Visually speaking the above implementation looks like the following:

Visualisation of the built autoencoder


Model training

The following lines are used to train the autoencoder. We are suing 100 epochs with the batch size set to 60. The best model will be saved in model.h5 file.


 nb_epoch = 100
 batch_size = 60

 autoencoder.compile(optimizer='adam',
                    loss='mean_squared_error',
                    metrics=['accuracy'])

 checkpointer = ModelCheckpoint(filepath="model.h5",
                               verbose=0,
                               save_best_only=True)
  
 tensorboard = TensorBoard(log_dir='./logs',
                          histogram_freq=0,
                          write_graph=True,
                          write_images=True)

 history = autoencoder.fit(X_train, X_train,
                          epochs=nb_epoch,
                          batch_size=batch_size,
                          shuffle=True,
                          validation_data=(X_test, X_test),
                          verbose=1,
                          callbacks=[checkpointer, tensorboard]).history


Prediction and error calculation


 autoencoder = load_model('model.h5')
 predictions = autoencoder.predict(X_test)
 mse = np.mean(np.power(X_test - predictions, 2), axis=1)
 error_df = pd.DataFrame({'reconstruction_error': mse,'true_class': y_test})
 fraud_error_df = error_df[error_df['true_class'] == 0]


Finding the best threshold

In order to find the threshold that provide the best results, we are using the following loop. It keep rising the threshold until attending the wanted accuracy. In this case we are trying to attend 0.6 of accuracy and 0.5 of recall.


 threshold = 0
 f1 = 
 recall = 0
 accuracy = 0
 iterations = 10000
 while (recall < 0.5 or accuracy < 0.6):
    if iterations == 0:
        break
    print '**************************'
    print threshold
    threshold+=.005
    y_pred = [1 if e > threshold else 0 for e in error_df.reconstruction_error.values]
    conf_matrix = confusion_matrix(error_df.true_class, y_pred)
    tn, fp, fn, tp = conf_matrix.ravel()
    precision = 1.*tp/(tp+fp)                                      
    recall = 1.*tp/(tp+fn)                                                 
    f1=(2*recall*precision)/(recall+precision)                                                     
    print 'TP:'+str(tp)                                                         
    print 'FP:'+str(fp)                                                             
    print 'TN:'+str(tn)                                                                 
    print 'FN:'+str(fn)                                                                     
    accuracy=1.*(tp+tn)/(tp+tn+fp+fn)                                                                         
    print 'Accuracy:'+str(accuracy)                                                                             
    print 'Precision:'+str(precision)                                                                                 
    print 'Recall:'+str(recall)                                                                                     
    print 'F1:'+str(f1)


After several iterations, we obtained the following result:


In the following chart, the selected threshold (1.83 is this case) is represented by the red line.

This figure represents all the points with the threshold


Zooming the area above the threshold (malicious URLs)

Zooming on the area below the threshold (normal URLs)

This represents the following results: Accuracy: 60%, Precision: 22.62%, Recall: 50.42%.

Source code 

The enriched dataset, source code, pre-trained model and an English dictionary are all available in https://github.com/slrbl/malicious-urls-detection-with-autoencoder-neural-networks, don't hesitate to test, star and contribute!

Conclusion 

Although we haven't got an excellent prediction results for the built model, this article showed that using autoencoders could be a good solution when it is about unlabelled datasets especially in cybersecurity contexts where early anomalies detection is a key for proactive approaches. The threshold could be adapted to the problem you are trying to solve, it should be calculated according to if recall is important for you or a good global accuracy is enough.